


Modeling With ETABS
Getting Started with ETABS/ Modeling in ETABS/ ETABS
ETABS allow the users to
- Create and modify computer models.
- Create structural elements (columns, slabs, shear-walls, beams).
- Create structural elements (columns, slabs, shear-walls, beams).
- Analyze multiple scenarios and conditions, such as,
- Earthquake and wind loads,
- Sequential loading of construction,
- When the analysis is run, it goes from an object based to an element based model
- The analysis consist of frames, joints, linked with shell elements.
- Design and optimize multistory buildings (steel/composite, concrete frame and shear-walls.)
- All these steps through a single graphic user interface (GUI).
1. Define the building’s geometry (it’s footprint, including the adjacent
structures, establish the gridlines, etc…).
2. Consider the implications of the geographic location of the building.
3. Establish the codes, analysis procedures and design criteria to be applied
(for example, ASCE 7, UBC, IBC2000, Florida Building Code, ACI 318).
4. Define the loads (dead, live, reduction factors, wind and seismic).
5. Choose the structural elements, such as columns, shear-walls, etc.
6. Define the working units (for example, lb-in, kips-ft, etc.).
7. Define the various concrete strengths (eg, 4000 psi, 8000 psi, etc.).
8. Define the modulus of elasticity for concrete.
9. Define and create columns sizes and strengths for all different levels.
10. Define wall strengths and thickness.
11. Define steel strength and modulus of elasticity.
12. Place columns and shear-walls upon the gridlines.
Modeling a Building in ETABS
Note:click the images to see it clear
Parameters
Columns:> 30" x 30 ''
Beams :> 24" x 24 " Shear Walls :> outer walls =84" inner walls=24" Transvers walls = 8"
Vertical Spacing b/w Coloumns = 25'
Horizontal Spacing b/w Columns = 30'

 Define a New Model
A New Model Initialization window opens in which you will be asked to whether to initialize your new model with definitions and preferences with existing .edb file...
For instance click no in this problem
 Define the ist Story
 Choose "Grid Only"
Model of ist story properly,run analysis and check for any improperly connected nodes.
Alternatively use ETABS' Uniform grid spacing
 or
orEtabs custom grid spacing


Define Properties
- Material Properties
- Frame Sections
- Slab/Wall Sections
- Static Load Cases
- Load Combinations
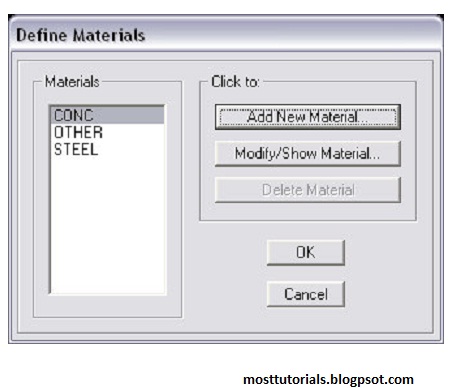
 1-Material Properties
Add New Material

Or
Define Material Properties
Suppose a Concrete of Fc'=4ksi
 2-Frame Sections
Add New Rectangular Section


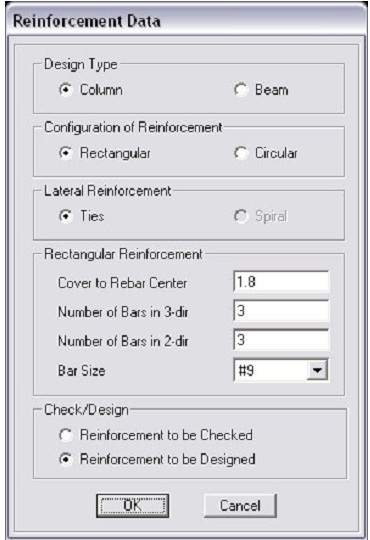
Place The Concrete Coloumn on the Grid
 ADD BEAM
 ADD WALL SECTIONS
 ADD SLAB
 Define The Load Cases
Load Combinations
DDL = Design Dead + Live Load
SDL = Service Dead + Live Load


Draw Coloumn,beams,shear walls......to be continued...


2 comments:
THIS IS VERY GOOD TUTORIAL FOR PRACTICING ENGINEERS
you all are welcome
Post a Comment