Performing Common Tasks in Revit Architecture
In this exercise, you learn to perform some of the common Revit Architecture tasks that are included in the tutorials. After you are familiar with these tasks, it will be easier to work in Revit Architecture and focus on the lessons of each tutorial.
Use zoom commands to adjust the view in Revit Architecture
In the tutorials, you are instructed to use a zoom command to adjust the viewable area in the window. For example, you may be asked to zoom to a specific region of a view or to zoom to fit the entire building or floor plan in the view. Understanding how to adjust the view will make it easier to work with the building model in the window.
There are several ways to access zoom options. In the following steps, you open a training file and practice adjusting the view with the different zoom commands.
- Click File menu ? Open.
- In the left pane of the Open dialog, click Training Files, and open Imperial\i_Cohouse.rvt.

3 Click View menu ? Zoom to display the zoom menu.
The zoom menu lists the zoom options and their shortcut keys.
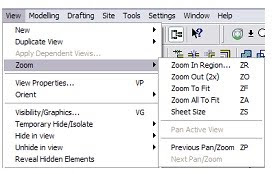
4 Click Zoom Out (2x).
In the drawing area, the view zooms out from the building model.
5 On the View toolbar, click the drop-down menu next to the Zoom command to display the
zoom options.
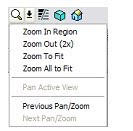
6 Click Zoom To Fit.
The view of the building model is sized to fit the available window.
7 Click in the drawing area, and type the shortcut ZR to zoom in on a region.
The cursor becomes a magnifying glass.
8 Click the upper left corner and lower right corner of the region to magnify; this is referred to
as a crossing selection.
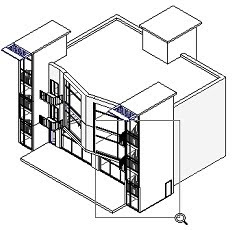
When you release the mouse button, the view zooms in on the selected area.
9 If you use a mouse that has a wheel as the middle button, you can roll the wheel to zoom the view. Use the wheel mouse to zoom out to see the entire building again.
If you do not have a wheel mouse, use a zoom menu command or the toolbar option to zoom
out.
NOTE As you zoom in and out, Revit Architecture uses the largest snap increment that represents less than 2mm in the drawing area. To modify or add snap increments, click Settings menu then Snaps
Zoom is also available using SteeringWheels. SteeringWheels provide 2D and 3D navigation
tools.
Using Steering Wheel in Revit Architecture
- To display SteeringWheels, on the View toolbar, click .

- The Full Navigation wheel displays in the drawing area.
- As you move the mouse, the wheel follows the cursor around the drawing area.
- Move the cursor over the Zoom wedge of the wheel so that it highlights.
- Click and hold the mouse button.
- The cursor displays a pivot point for the Zoom tool.
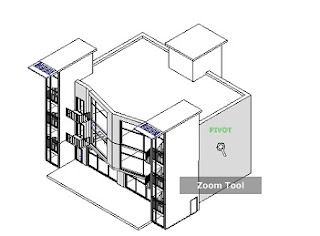
- Drag the cursor down or left to zoom out.
- Drag the cursor up or right to zoom in.
location, and then using the Zoom tool again.
For more information about SteeringWheels, click the pull-down menu on the Full Navigation
wheel, and click Help. To define settings for SteeringWheels, click Settings menu ? Options,
and click the SteeringWheels tab.
- To exit the wheel, press ESC.
- In the Project Browser, expand Views (all), expand Floor Plans, and double-click 2nd Flr. Cnst.
size of components in the drawing area. Small blue dots, called drag controls, display at the
ends of selected lines and walls in a plan view. Similar controls, referred to as shape handles,
display along the ends, bottoms, and tops of selected walls in elevation views and 3D views.
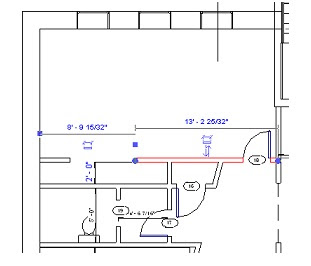
- Type ZR, zoom in on the upper-left corner of the floor plan, and select the wall, as shown.
- Click and drag the left control, moving the cursor to the left horizontally, to lengthen the wall.
- Click in the drawing area to deselect the wall.
Move an element
- Scroll the view down so you can see the couch and table in the floor plan.
selecting the element to move, for example, click to specify the starting position, and click again
to specify the ending position. In this case, you want to move the table closer to the wall.
- Click the lower-left endpoint of the table.
- Click next to the lower wall, as shown.
The table moves down, and the lower-left corner is placed at the move endpoint. - Select the plant, and drag it on top of the table.
- On the Standard toolbar, click the drop-down menu next to (Undo).
effects of one or more commands. In this example, you decide that you prefer the table in its
original position.
- the Undo menu, select the second item in the list, Move.
to and including the selected command. The table and plant are returned to their original
locations.
NOTE To quickly undo the previous action, on the Standard toolbar, click the Undo command, or
press CTRL+Z.
End a command
- On the Basics tab of the Design Bar, click Lines.
command or end the current command.
- Click in the drawing area to start the line, and click again to end it.
- To end the command, use one of the following methods:
- Choose another command.
- On the Design Bar, click Modify.
- Press ESC twice.
- the file without saving your changes.


0 comments:
Post a Comment